Jan 31, 2012

Phase 1 - Project Room Organization

We've let Kent and Kurt's room go for months now. It pretty much made me ill every time I stepped foot in it. So I stopped going in there. You see, I've organized their room countless times and they are just unable, and unwilling, to keep it up. In the past, I literally would be in tears during the hours and hours of my sitting in the middle of their room going through box after box, and stack after stack, of stuff. As the older boys got older, their toys/Legos/games got handed down to K&K and put in their room. So it was overflowing, not just with their own items, but with items from 10-12 years ago. So, one of my 12 for 12 goals for this year was to get their room back in shape. And somehow I motivated myself to do it in January - yay!

I started with the closet so that as I got rid of stuff in there, we could store items from the room in it. A big dilemma was of course, their Legos - the loose ones and where to put them. Currently they had many plastic boxes of them stuck under Kurt's bed. I emptied a 6 drawer Iris cart that had art supplies in it (that they were no longer using) that was inside the right side of the closet, and most of the loose Legos fit in there - sorry I forgot to take a pic!

The other side had old books, puzzles, and games on the upper shelf and other things just crammed in below. I was able to clear out all the books, recycled all puzzles less than 500 pieces (because I was not going to put them together, nor count the pieces to see if they were all there), and throw away board games that were missing pieces. As a result we were able to get all their Lego board games in there plus the other games that were left. And store some other toys down below. Oh, and now we can close the doors.

This is the whole room - theirs is a long room, so taking pics of it from the door only got one side of it. They have their Ikea loft beds along one side and they sleep head-to-head.

Kurt's side. Since pre-school, he has loved frogs. And so far is unwilling to part with them. OK, by me, I'm in no rush for him to grow up. ;) In the top right-hand corner is a vanity that my Uncle Wilfred made me when I was a little girl. For Christmas that year I was dying for a vanity! It's all I wanted. So my parents had him make one. Since it came from Santa, I didn't find out it was made by him until many years later. It has held up all these years.

Kent's side. I didn't have room to take a before picture close-up, so I had to crop it from the room pictures. He also has a favorite - big cats. :) So his side is more jungle-ish.

As we went through everything, it was a constant chore to pick out the Legos, K-Nex, airsoft BBs, and Nerf ammo amidst all the other junk. These are 2 boxes at the end of Kurt's bed - the bottom has stuffed animals in it that *I* am not ready to part with that belong to the boys. The top overflowing box contains all their Nerf guns. Ammo containers are sitting on the stool that goes with my vanity. :)
 

K&K were a great help this time. They helped carry stuff out of the room so we could get started and I gave them boxes to sort the items into keep, give away, throw away piles. We still have some things left that I'm not convinced they will ever touch again, so I told them we would revisit those items this summer.
We packed up several boxes full of like-new books, some big floor puzzles, animal stamps, and the last of their plastic animal figures and took them over to a friend of mine who has 9 children - 5 of them under 7. It was like Christmas for them! The rest of it got recycled or thrown away, with just one more bag to give away.
After about 12 hours, I was so happy to have this room to this stage. We still have another phase to do, organize all the shelves, desk, and Lego displays and clothing. I'll be back another day with the befores and afters of Phase 2.

Jan 15, 2012

At the Phoenix Suns Game

I've only been to 2 Phoenix Suns games. I'm not a huge fan of theirs, so I must have a big incentive to go. Several years ago we ended up getting Senator John McCain's tickets the day after Christmas. Greg worked with the wife of McCain's Chief of Staff and I guess no one else wanted those tickets! :) It was pretty sweet - we sat in the front row floor seats and had access to the Courtside Club under the stands where we got all the free food and drinks we wanted, and got to hang out with the Suns players. 


The game was on TV but we happened to be in a spot where the cameras never reached (that's probably why McCain's seats were there). However with 2 minutes to go, a player from the other team fell on the guy next to me, so the cameras caught it, and us on TV. We were taping the game at home so we were able to see ourselves. I had no pictures of this experience because Greg wouldn't let me bring a camera, so I paused the game on TV when we were shown, and took a photo of the TV. Yep, I go to extremes to document our lives.

This past Thursday night we had another unique opportunity to see a Suns' game. Greg's partner has a client who works for the Suns and he was able to get us a suite for free to watch the game.  


It holds 16 people, so we let the boys bring friends.


And then his partner invited several friends also. Including her boyfriend's sister who was on The Bachelor, but got kicked off the first show. 

The Suns lost (they aren't that good this year), but it was a fun way to watch the game. I told Greg, next time try to score Loge seats - you get a free buffet with those!!  ;)

Jan 8, 2012

The ants go marching one by one - Hurrah, hurrah!

We have a huge problem with ants. Usually it's during the warmer months and outside. This past year, they invaded our tortoise pen in a really bad way. Our biggest tortoise, Max, was running (as best as torts can do) around frantic for days before I figured out the problem. 

Since you can't spray pesticides around animals, I needed to try the method my tortoise care email group (what?) recommends for homemade ant bait. This doesn't kill the ants on contact, it allows the workers to take the bait/poison back to their nest so it will kill the queen and thus the nest.

Supplies: boric acid, sugar, water, cotton balls, glass jar with lid, and a plastic container with a lid.

For a 1% solution, mix the following:
1 tsp boric acid (if you find the ants dying right away, lessen this to 1/2 - 3/4 tsp)
6 tbsp sugar
2 C water

Mix together in a glass jar until dissolved. Label and store safely and somewhere way out of reach.

Take your plastic container and make holes around the bottom - big enough for the ants to get in. Soak a few cottons balls with the mixture (be VERY careful when handling this!) and place in the container, then put on the lid.  

 Place the container near ant trails. With the small openings and lid, our tortoises could not get to the poison so I was able to put this in their pen. If you are using this around larger creatures, secure the container with something heavy on top. Freshen 1-2 times a week depending on the success of it or the evaporation of the mixture. You can also use the decreased strength on a regular basis to keep the ants away.

Fast forward to NOW, when we are supposed to be ant-free since it's winter...only it's very warm out. So what do I find in our downstairs bathroom? Ants yet again. My first reaction was to spray pesticide. But all that does is make a big smelly mess and kill the ones inside, while they keep coming and coming from outside. And this time, we couldn't tell where they were getting into the house. 

I decided to try my boric acid mixture and put the container into the shower. I gave strict instructions to Greg NOT TO SPRAY the ants (because I knew he would). We want them to carry the poison back to their queen to kill the whole nest! And sure enough, within a few hours a huge long line of ants were filing into the shower and surrounding the container. This also let us discover how they were getting in. It's been a couple of days and I just took the picture above - hardly any ants around. Now Greg has asked me to make up more of these to put outside where he has seen more ants. Even though we have no animals outside right now, I'll still want to keep the container anchored with a lid so no roaming cats, dogs, or lizards get to it.

Jan 1, 2012

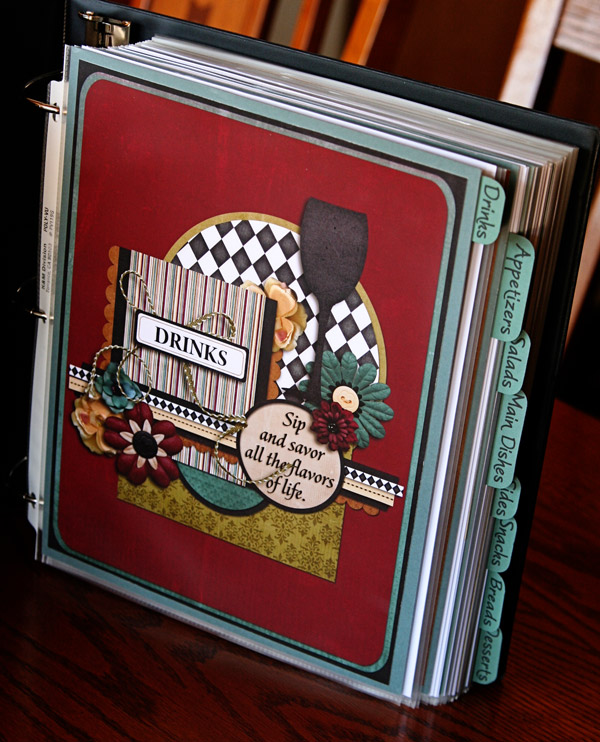
My Recipe Binder

It's been over 28 years since I moved to Arizona right after college. Before I left, I rummaged through my mom's recipe box and copied down a few favorites. I really didn't know how to cook that well, but I figured (hoped) I could follow a recipe. I moved to Arizona with one vessel to cook in - a Wok. I had no pots or pans, but since I moved out to Arizona without a job and I really didn't even know where I was going to live, kitchen stuff was the least of my worries.

Fast forward through those 28 years...my mom visiting and bringing more recipes with her. Her homemade french bread, cinnamon rolls, gingerbread cookies...of course I never made those myself. But she was out here often enough that she kept copies of those recipes here. Handwritten recipes and notes of what and when they were made. Each time she visited, we had to search for those recipes as they undoubtedly were stuck in a cookbook or under a pile of papers somewhere. It was frustrating to say the least.

When my local scrappy buddies first came up with the idea of a recipe binder, I was hesitant. I still don't consider myself much of a cook (try being a great cook with 5 males in the house who are super picky and rarely eat the same thing), so I wasn't sure I wanted to go through the hassle of making one. Then I remembered the mess all my recipes were in and thought I'd start one digi-style.


I chose a gorgeous kit called Here's the Dish by Melissa Bennett and Heather Roselli to make the covers and divider pages. I also used a variety of templates by Cindy Schneider that I altered quite a bit to fit what I needed.


I started with a 3" black binder with pockets for inserts. I chose coordinating cardstock for the tabs and used Staples Photo Supreme Double-Sided Matte papers for printing. The only other supplies I needed were a corner rounder and my paper cutter and some ribbon (to decorate the cover).


I designed my divider pages using the kit and template. I used a quote on each page and with the beauty of digi-scrapping...I printed each twice and put them in a page protector so that either way the book was open, I could see my pretty divider page. :)


My categories are: drinks, appetizers, salads, main dishes, sides, snacks, breads, desserts. The tabs were printed on a regular piece of cardstock, cut down, then I used my corner rounder on the sides.


I also reversed the cover (another perk of digi-scrapping!) for the back, and made a spine insert.


For my recipes, I put everything in page protectors. It keeps them clean. Some of my friends, though, had a lot more recipes and just used a 3-hole punch and put them in without the protectors. Many of my recipes were on recipe cards. Many were written by my mom and some by my late dad. There was no way I was going to sacrifice those momentos for a prettily scrapped recipe. Plus, all those recipe cards I hand-wrote when I moved out to Arizona - I kept those as is also. So my binder has ended up a mish-mash. And I love it that way!


If you do put in your recipe cards, you'll want to put those in a page protector so you can see the front and back of them.


Here's some of my mom's notes I've saved and added them in next to the recipes. How priceless is that! Especially the times when my parents came out when my boys were born and she took care of all of us.


Here's the rest of my divider pages. 


When my mom visited this past summer, I had her bring out her most favorite recipes from her recipe box - there were random notes, newspaper clippings, and various recipe cards. I took pictures of all the recipes I wanted and will add them to the book. So I still have some work to do! She was thrilled that we don't have to hunt for her recipes anymore - she knows to head straight for my new binder.